

Export to assembly (.asm)
A HEX file is a list of bytes. This command turns it back into 8051 assembly source that you can read, edit, and hand to an assembler, and the output is built so that assembling it again gives you the bytes you started with.
That last point is the whole promise, so it is worth being plain about it. Every operand is decoded to a real value. Where the Memory Map View shows you the shape of an instruction, the exported file shows you the instruction itself.
Where to find it
The command sits in two places, because it is both a file operation and the thing you usually want the moment a disassembly appears.
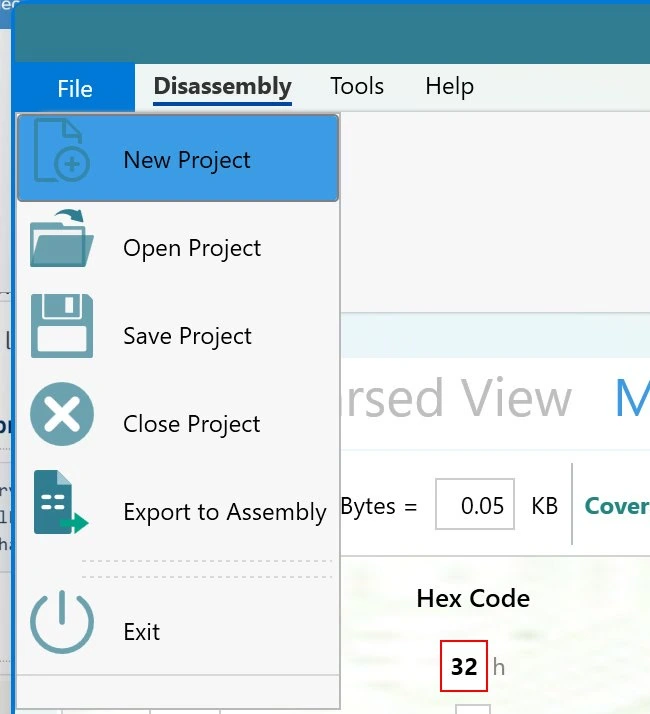
- On the File menu, next to Open and Save, as Export to Assembly.
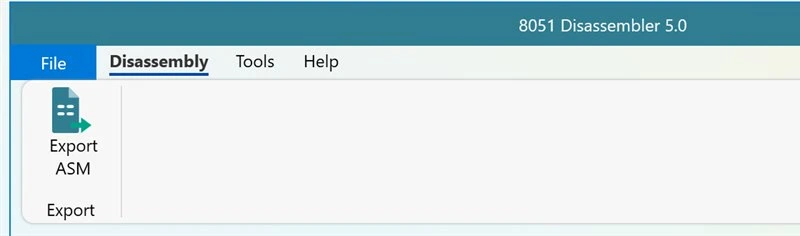
- On the Disassembly tab of the ribbon, as Export ASM.
Both are disabled until you have pressed Parse. Until a file has been parsed there is no disassembly to write, so rather than offer a command that would produce an empty file, we leave it switched off.
The options
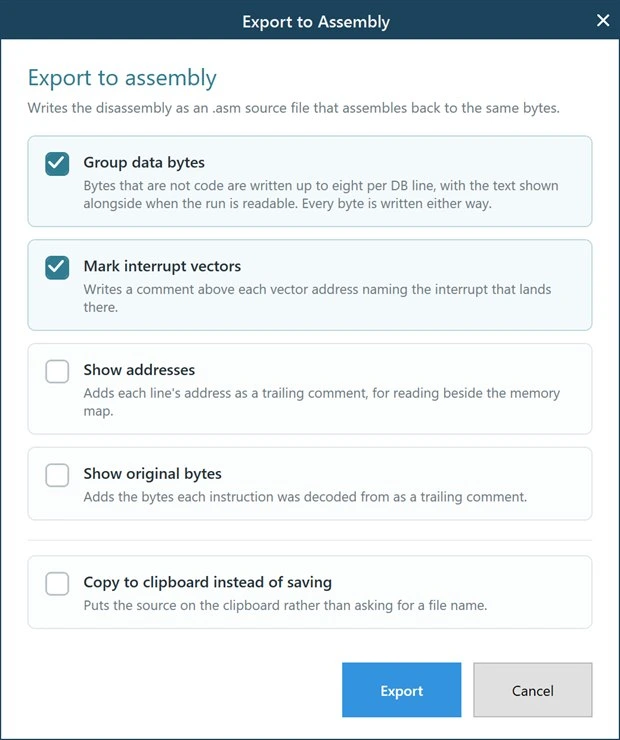
Choosing the command opens a short list of choices. The first two are on by default and the rest are off.
- Group data bytes. Bytes that could not be decoded as an instruction are written up to eight per
DBline, with the text shown alongside when the run happens to be readable. Turning this off writes one byte per line instead. Either way every byte is written, because a file that reassembles cannot depend on a display setting. - Mark interrupt vectors. Writes a comment above each vector address naming the interrupt that lands there, so the reset vector and the timer and serial entry points are labelled rather than left as bare addresses.
- Show addresses. Adds each line's address as a trailing comment. Useful when you are reading the exported file beside the Memory Map View.
- Show original bytes. Adds the bytes each instruction was decoded from, again as a trailing comment. Useful when you are checking the disassembly rather than assembling it.
- Copy to clipboard instead of saving. Puts the source on the clipboard rather than asking for a file name, for when you only want to paste a routine into something else.
What the output looks like
Here is a complete export of a small program, exactly as the application writes it.
; 8051 Disassembly - Generated by SpiceLogic 8051 Disassembler

            ORG     0003H
; EX0 Vector
EX0:        RETI

            ORG     0023H
; Serial Vector
Serial:     RETI

            ORG     0025H
sub_0025:   MOV     TCON,#00H
            MOV     TMOD,#00H
; T2 Vector
entry_002B: MOV     PSW,#00H
            MOV     IE,#00H
            RET
sub_0032:   MOV     R7,#00H
loc_0034:   INC     R7
            MOV     A,R7
            CJNE    A,#0FFH,loc_0034
            RET
            ACALL   sub_0025
loc_004B:   CPL     P1.0
            ACALL   sub_003A
            AJMP    loc_004B

            END
A few things in there are worth pointing out, because they are the parts that make the file usable rather than merely correct.
The label column
The first twelve characters of each line are reserved for a label, then eight for the mnemonic, then the operands. Any label in your symbol table appears there, and every branch that lands on it is written as the label rather than as a number. In the sample above, ACALL sub_0032 and AJMP loc_004B are both jumps whose destinations the application worked out and named.
A label is only ever substituted when the target really is the start of an instruction. A branch into the middle of a multi byte instruction is a real thing in obfuscated or damaged firmware, and there is no label there to jump to, so in that case the address is written out and a comment says why.
Register and bit names
Direct addresses in the special function register range come out as names: MOV TCON,#00H rather than MOV 88H,#00H. Bits are written as a register and a position, so CPL P1.0 rather than a bare bit number. That form is what the Intel manual uses and every 8051 assembler resolves it, which is what keeps the output portable.
Data, and how we decide what it is
Nothing in a HEX file says which bytes are code and which are a lookup table, so a string sitting after a return will be read as instructions. That is a property of the format rather than a shortcoming of any one tool, and the exported file agrees with the Memory Map View so the two never tell you different stories.
What we can be certain about is written as data. A reserved opcode, or an instruction whose operand bytes fall past the end of the file or into a gap between records, comes out as a DB line with a comment explaining it. We never invent a mnemonic, and we never read a byte that is not there to complete an instruction.
Gaps and ORG
The file opens with an ORG at the first loaded address, and a fresh ORG starts every region after a gap in memory. This is what keeps the addresses right: without it, everything after the first hole would assemble a few bytes adrift.
Files loaded above 64 KB
An 8051 program counter is sixteen bits, so ORG can only carry an address inside a single 64 KB bank. If your HEX file uses extended addressing to load above that, the exported file still carries the low half of the address, and each ORG is preceded by a comment naming the bank it belongs to. We write the comment rather than silently truncate, because a truncated address that looks ordinary is the kind of thing that costs an afternoon.
Large files
The export runs in the background with a progress indicator, so the window stays responsive on a full 64 KB image, and you can cancel it.