Overview
ASP.NET PayPal Control for Website Payments Standard is actually a set of ASP.NET Web Form Controls and ASP.NET MVC Components for various features offered by the PayPal Website Payments Standard. If you are not familiar with the term "PayPal Website Payments Standard", please visit this page before reading this documentation. The set of controls/components are Buy Now Button, Donation Button, Subscription Button, Cancel Subscription Button, Add to Cart Button, View Cart Button, Upload Complete Cart Button, IPN Handler, and PayPal Return Handler. The controls can be used in Visual Studio 2005, 2008 and 2010. The controls can be used for developing Websites / Web Applications (ASP.NET WebForm or MVC) targeting .NET 2.0, 3.0, 3.5 and 4.0.
Before we start, it is recommended that you get introduced with this product by the following Video Demonstration: (This video contains voice presentation, so you should make sure that the speaker sound is turned on of your computer.)
It is easy to demonstrate the features of this control/component set for WebForms. So let's start with Web Form demo. But please do not underestimate this component set as if these are only for Web Forms. These component set are specially optimized for ASP.NET MVC framework as well.
When you add the assembly to your Visual Studio toolbox, you will see a list of controls has been added as shown in the following screenshot: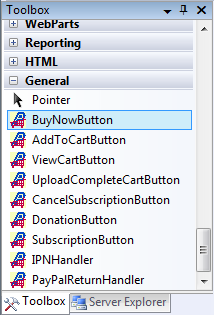
PayPal Website Payments Standard offers the following button types for Single Item Payments:
Moreover, PayPal offers the following button types for Multiple Item Payments:
- Add to Cart Button (for PayPal hosted shopping cart)
- View Cart Button (for PayPal hosted shopping cart: Displaying items added by Add to Cart Button)
- UploadCompleteCart Button (for uploading 3rd party shopping cart items to PayPal.)
Furthermore, PayPal Offers the following button Types for periodical (Subscription) payments:
Additionally, the assembly comes with two useful non-visual components:
Based on the PayPal Website Payments Standard e-Commerce pattern, we have divided the business logic of this control into 3 phases. Pre Payment Phase, PayPal Phase, Post Payment Phase.
Pre Payment Phase.
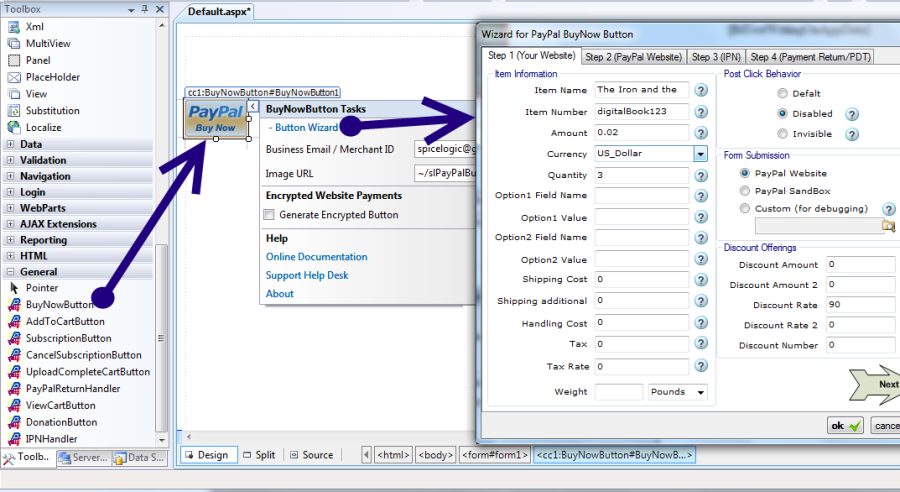
Pre Payment Phase includes programming & submitting your PayPal Buttons (Buy Now Button/Donation Button/Shopping Cart/Subscription ... etc). An ASP.NET web form cannot contain nested HTML forms and that limitation makes it impossible to use PayPal provided button HTML within an ASP.NET web form. But when you use this control, you won't have to worry about any of those challenges at all. You can place this control within your ASPX web form and follow the enhanced design-time Smart Tag GUI Wizard for setting properties of your PayPal button which will be eventually serialized to HTML form variables like "item_name", "item_number", "amount" etc and submitted to PayPal. You can check those outgoing HTML form field values for debugging too..... More in details ..
When you place an instance of any of the listed controls to your Web Form ( aspx page), you will be offered to configure the control properties using its enhanced design-time GUI support.
PayPal Phase
When your customer clicks on the button for purchase, he/she is taken to the PayPal Website and PayPal collects money from your customer for the item he/she purchases. In order to set the visual style of the PayPal phase, this control comes with a composite property name "PayPalDisplayPage" which contains sub-properties like "PayPalDisplayPage.Header_BgColor", "PayPalDisplayPage.Header_Image_URL" etc which can be predefined from the Pre Payment Phase. When you are using the Design time GUI Wizard for configuring the button, you will see a tab named "Step 2 (PayPal Website)" which contains settings wizard for the styles and behaviors of PayPal phase as shown in the following screenshot.: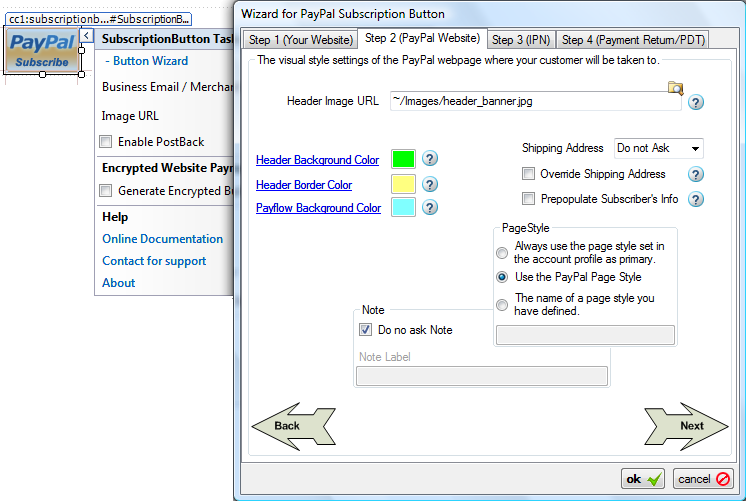
Post Payment Phase.
Post Payment Phase includes handling Instant Payment Notification (IPN) and Payment Data Transfer (PDT).
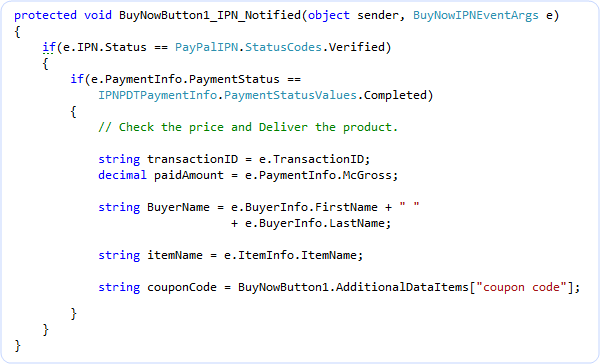
When your customer just makes the payment in PayPal website, PayPal asynchronously notifies your website about it. This notification is called Instant Payment Notification (IPN). This control can capture that notification, verify the notification with PayPal in the back-end and finally fires a server-side event named IPN_Notified, collects the Posted IPN data and deserialize that data to a strongly typed relational Object Model and offers you that Object Model through the event argument of the IPN_Notified event.
When your buyer is returned to your web page from PayPal after the payment (either completed or canceled), this control fires PayPal_Returned event and collects all PDT (payment data transfer) data and gives you strongly typed Event Argument objects so that you can do additional programming tasks in addition to saying "Thank you for your payment."
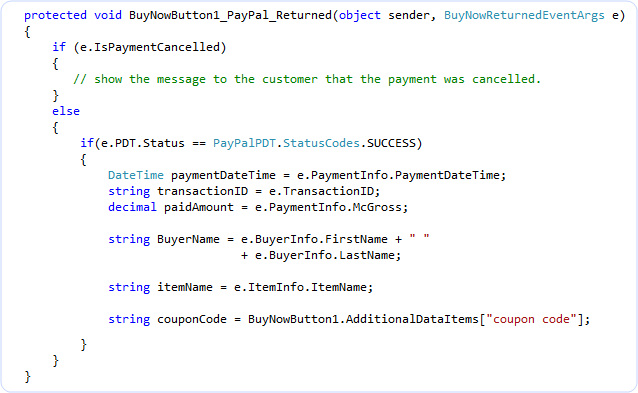
This design pattern allows the application developer easily organize prepayment and post-payment controller logic on the same page.
Now, what about ASP.NET MVC overview? You know, you just need the API for MVC that can print HTML from the View page. All of these buttons are actually individual class library which can be instantiated from your Controller class or View page and a method named 'RenderForMVC()' will emit the HTML required to publish the PayPal button Form. We have created dedicated pages for MVC usages for BuyNow button, Donation Button, Shopping Cart buttons, Subscription buttons etc.
The most exciting fact to consider adopting PayPal Website Payments Standard is, 'It is FREE'. You do not need to pay any monthly bill for using this service. Another exciting fact is, 'SSL is not required in your website'. Implementing SSL is expensive. As your customer provides his/her financial information through PayPal website and PayPal website is already secured, you do not need to implement SSL on your website at all. PayPal never shares your customer's financial information with you (merchant) so there is no risk of the man-in-the-middle attack.
As a merchant, if you want to use PayPal Website Payments Standard, you must have your PayPal account upgraded to a Premier or Business Account. If you did not upgrade your account to a Premier or Business account, you cannot receive payment. You can upgrade your PayPal account easily by logging in to your PayPal account and visiting https://www.paypal.com/us/cgi-bin/webscr?cmd=_business-upgrade-info