Add to Cart Button Control for ASP.NET Web Form
This chapter explains the usage and facts about Add-to-Cart Control for ASP.NET Web Form. If you want to learn about the ASP.NET MVC Component, please visit this page.
When you have multiple types of products available for sell from your website, you have 2 options. Either you can use PayPal hosted shopping cart OR you can use your own shopping cart and finally upload the items of your own shopping cart to PayPal hosted shopping cart programmatically in a single step. If you do not want to spend effort for building your own shopping cart, then, using PayPal hosted shopping cart can be a good choice, specially when you got the SpiceLogic PayPal Control for Website Payments Standard. Because, SpiceLogic offers 'Add to Cart' Button which can be dragged and dropped into your web form, can be configured with item name, amount, quantity and many other parameters both from design time and programmatically and finally various events of this control can help you track the transaction after the payment received by your customer. Whenever your customer clicks the 'Add to Cart' button, the Item is uploaded to PayPal hosted shopping cart and your customer is taken to PayPal 'View Cart' page. From that 'View Cart' page, your customers have option to come back to your website for shopping (adding more items to the PayPal cart) OR proceed to 'Check Out' page. You can simply place the Add To Cart button within your GridView template in a data binding scenario. The add to cart button is featured with Click Event and ReturnedForShopping event. We will discuss about the usages and features of the Add to Cart button in this page.
If you want to use your own shopping cart and finally upload your shopping cart items to PayPal hosted shopping cart programmatically, then, Upload Complete Cart button is the control you are looking for.
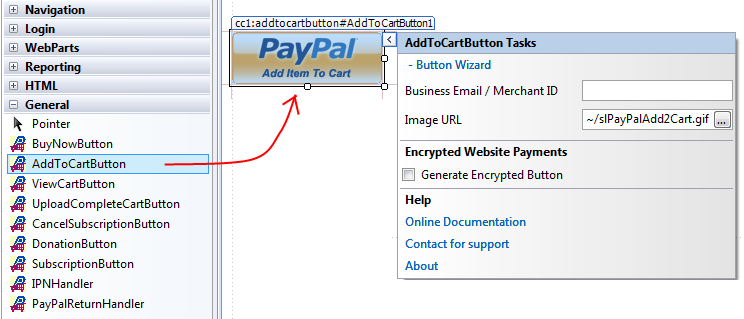
- Drag and drop an instance of the Add To Cart Button control from your Visual Studio Toolbox as shown below:
The first property of this control that you need to set is your Business Email Address or Merchant ID of your Merchant Account. If you are testing in Sand Box, then, this is the account which you created as 'Test Merchant Account' as explained in the Sand Box preparation chapter. Please do not get confused with the Developer Central Login account with the Test Merchant Account. Merchant ID is an alternative to using your Email address. It is better not to expose your business email address in order to protect your Email In-box from Spams. You can set either Business Email or Merchant ID from the Smart Tag or from the Property Editor. In order to get your Merchant ID, log in to your PayPal account. If you are testing in SandBox, then, log in to your Developer Central Account, then log in to your Merchant Test Account from https://www.sandbox.paypal.com/. Click 'Profile' Menu, then, your Merchant ID will be shown up as shown in the following screen shot.
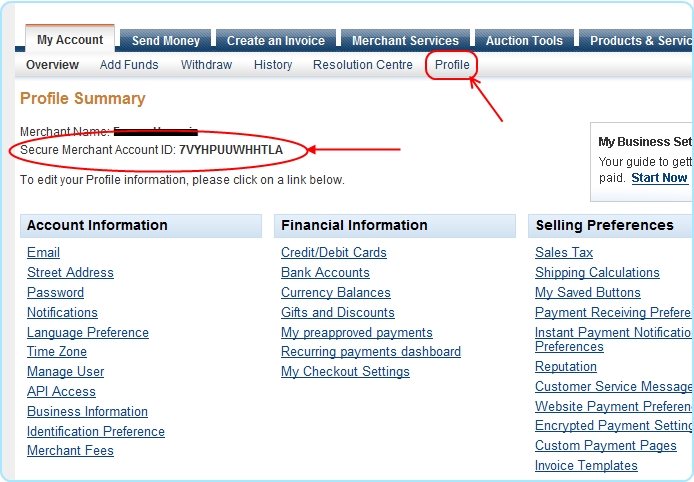
Set the merchant ID as shown here: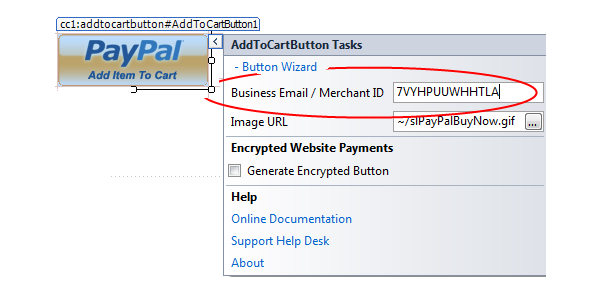
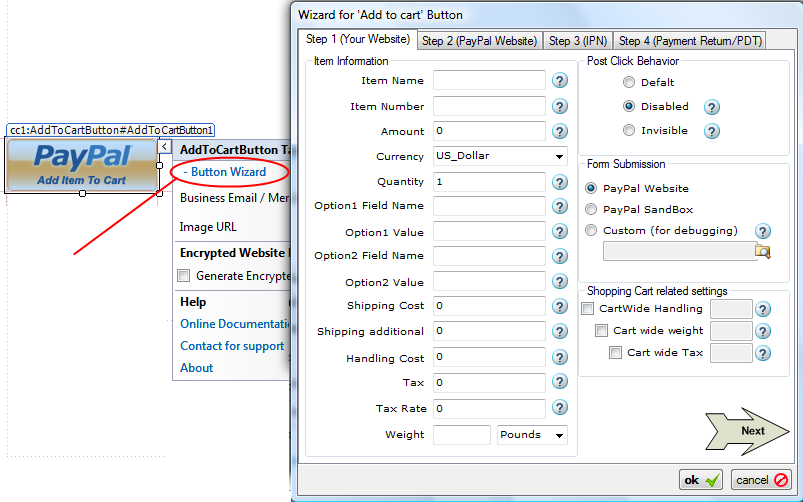
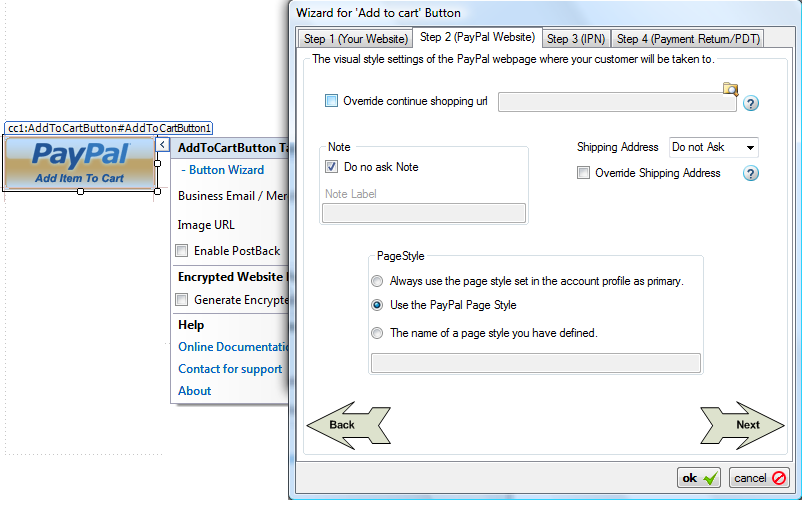
Now you may want to set few more properties like Amount, ItemName, ItemNumber etc and you can do all of these using the Wizard for the button which can be called by clicking the link found in the Smart Tag as shown in the following Screen Shot.
- Furthermore, you may choose to set the visual styles and PayPal page behaviors for the Add to Cart button. Just click the button "Next" shown in the wizard and you will be taken to configure the display page as shown in the following screen shot.
- If you want to pass unlimited custom data that you want to track from IPNHandler/PayPalReturnHandler, please check the feature chapter about Additional Data Items.
Setting Properties Programmatically using the Rich set of API. 
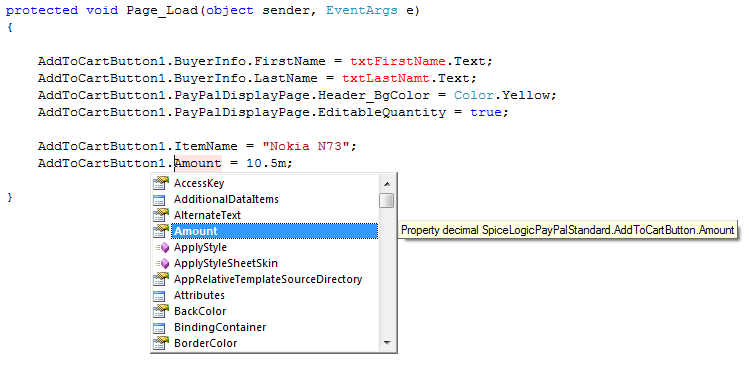
Click Here to view the complete Class Diagram that you may use as a reference when you set properties from your code.
You may want to set the properties of your 'Add to Cart' Button after the customer has clicked the Button for purchasing an item. For example, in your web form, you may have a text box asking your customer how may copies of the item he/she wants to buy. So, if the button is clicked, you can calculate the final price and then send the information to PayPal. In order to do that, this control has an event named "Click". It is similar to any standard ASP.NET button control's Click Event as shown in the following figure:
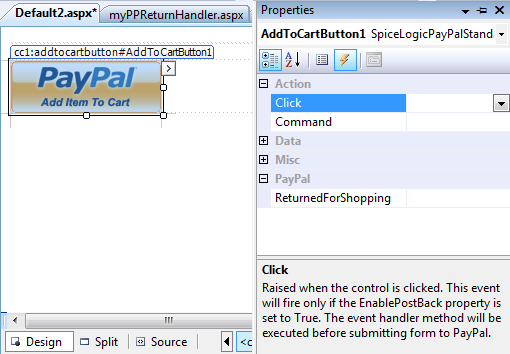
If you attach an event handler to this event, then the event handler method will be executed before the data is transferred to PayPal.
If your text box for quantity information has ID = txtQuantity and if you want to set price for a single item = US$ 34.78, then following snippet (C#.Net) shows how to perform calculation within Click Event Handler:
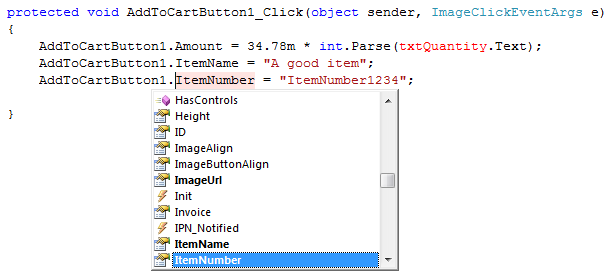
You can use Validation logic inside the Click Event handler of an 'Add to Cart' button and based on a condition (user input) you can cancel the submission to PayPal. Please check the method CancelSubmission()..
- The 'Add to Cart' Button will POST BACK only IF the Click event is handled. If you do not handle Click event, your customer will be taken to PayPal website directly from the Client Side without any Server Round Trip.
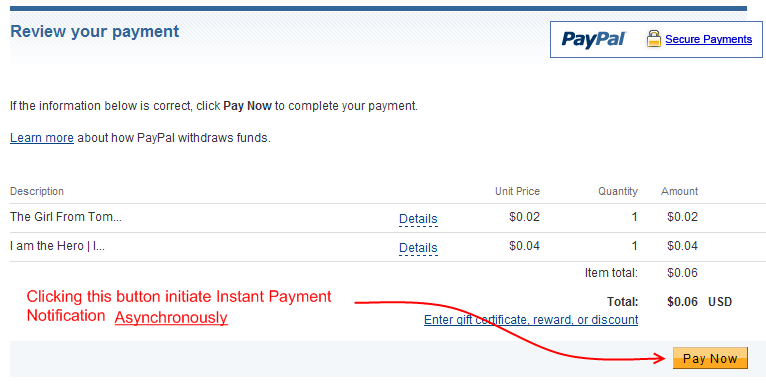
Handling Instant Payment Notification (IPN) from PayPal: When your customer finishes adding all of his desired products to his shopping cart and proceeds to check out page, a 'Pay Now' button is shown as shown in the following screenshot. When your customer Clicks the 'Pay Now' button in the PayPal website, PayPal sends notification to your website asynchronously which is called Instant Payment Notification (IPN).
- Unlike all other payment buttons (Buy Now button , Donation button etc), 'Add To cart' button is not a checkout button. Rather, it simply uploads an item to the PayPal hosted shopping cart. The checkout button is provided by PayPal in the very PayPal website when your customer is taken to PayPal website as a result of adding an item to the PayPal hosted shopping cart. So, PayPal needs to know a single ipn notify URL for all of the 'add to cart' buttons. So, unlike other Button Controls (i.e. Buy Now, Donation etc..), 'Add To Cart' Button control does not have any IPN_Notified event. Rather, the expected practice is: Assign each 'Add to Cart' Button a dedicated page for handling IPN. And each button's IPN handler URL must be the same URL otherwise, the last submitted 'Add To Cart' button's assigned notify_url will be considered to be the final ipn_notify URL for all 'Add to Cart' buttons that took part in the transaction.
- You can easily assign a dedicated page in design time as shown in the following screen shot:
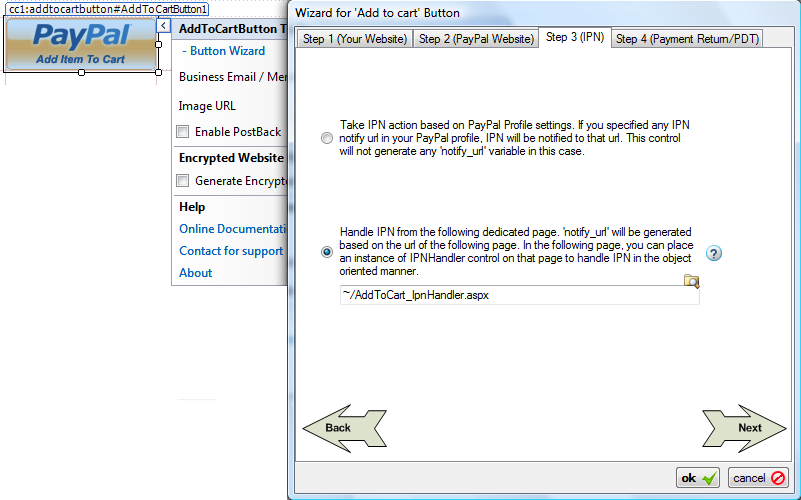
- In your dedicated IPN handler 'AddToCart_IpnHandler.aspx' page, you can place an IPNHandler Component. Then, handle the IPN_Notified event of that IPNHandler Component and get all the transaction data as shown in the following screen shot:
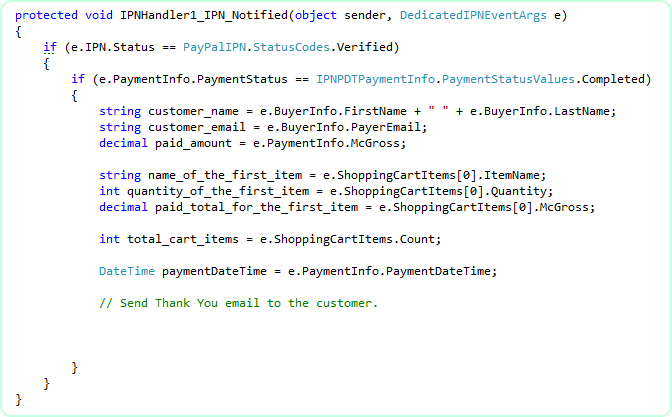
By the way, the above example snippet does not show the detailed way of handling FRAUD attempts in order to simplify the overview of IPN_Notified event. So, you should check the pattern for payment verification, fraud detection and automated Product delivery.
If you do not set any Custom Notification URL then, this control will not capture IPN at all. If you have specified any default IPN URL in your PayPal profile, then, PayPal will use that URL to send IPN for any transaction happens in your PayPal account in that case.
Consider this event as a pure Service Event, do not perform any task that directly interacts with User Interface Controls, Session Variables, Cookies, ViewState etc. When this event is fired, your customer wont see any effect of this event. For example, if you want to set Text of a Label Control 'Thank you for your Payment' in this event, your customer will never see that. Why ? Because, your customer is not directly responsible for firing this event, rather, PayPal Notification Service fires this event in a background thread. For that reason, this control Suppresses all HTML that could be rendered to the Event firer (PayPal Notification Service). Also, this control will STOP firing the Page_Load event of the hosting page. WHY ? Maybe you placed some code in your Page_Load event that directly interacts with Session Variables, Cookies etc or time consuming tasks like Executing lengthy SQL queries which is unnecessary or sometimes harmful for IPN session. So, this control will bypass Page_Load event in the IPN Session. But if you want to let this control fire the Page_Load event in the IPN session because you want to set IPN Settings programmatically from the Page_Load event, then, you have that option too. Set "PayPalIPN.EnablePageLoadEventInIPNSession = true" from the property editor and then, Page_Load event will be fired before IPN_Notified event, but you need to be very careful about using Page_Load event in this case.
If you are testing your web site from "Local Host" and if the custom IPN URL is a relative URL then you cannot test IPN handling at all. Because, IPN is activated by a notification service from PayPal, not directly by your customer. So, PayPal needs a publicly accessible URL where it can post IPN. The relative URL is eventually converted to an absolute URL based on the URL of your web site. When you are testing from localhost, the generated absolute URL contains 'localhost' or '127.0.0.1'. Obviously that URL is not publicly accessible and so your website wont know about it and fail to fire IPN_Notified event. The story is not end here. Whenever, PayPal IPN service Fails to get HTTP '200 OK' status from your Website as as result of IPN posting, the service will keep trying to post to the same URL again after few hours and it will keep trying for a certain period until it gets HTTP '200 OK' result from your website. That is bad for PayPal as PayPal's resource is being wasted. So, PayPal can disable the IPN for your account which is bad for you. In order to avoid that problem, the control will check if the Custom IPN URL is a relative URL or not. If it is a relative URL and if you are testing from local host, that means, the final URL would be an URL with 'local host'. So, in that case, the control will not generate any IPN information so that PayPal wont submit IPN. But if your Custom IPN URL is an absolute URL which does not contain 'local host' or '127.0.0.1' then, the 'Add to Cart' button will pass IPN information to PayPal so that PayPal can submit IPN. In any case, if the control does not pass any IPN information to PayPal, then, PayPal will check if you have specified any default IPN URL in your PayPal profile. If so, then, PayPal will submit IPN to that default URL in these cases. But whenever you upload your test website to a production server where the hosting page of your IPN Handler page has a REAL accessible URL, then, IPN_Notified event will be fired as usual.
Membership users, please note:
If you are using ASP.NET Membership feature in your website, then, you need to allow PayPal to see your page where you placed your IPN_Notified event handler code. Your IPN handler page should be accessible to all users.
You do not need to turn IPN option ON from your PayPal account at all. This control will take care of everything for you.
Whenever your customer is transferred back to your website from PayPal website after completing or canceling a payment, you can execute post payment business logic on your website.
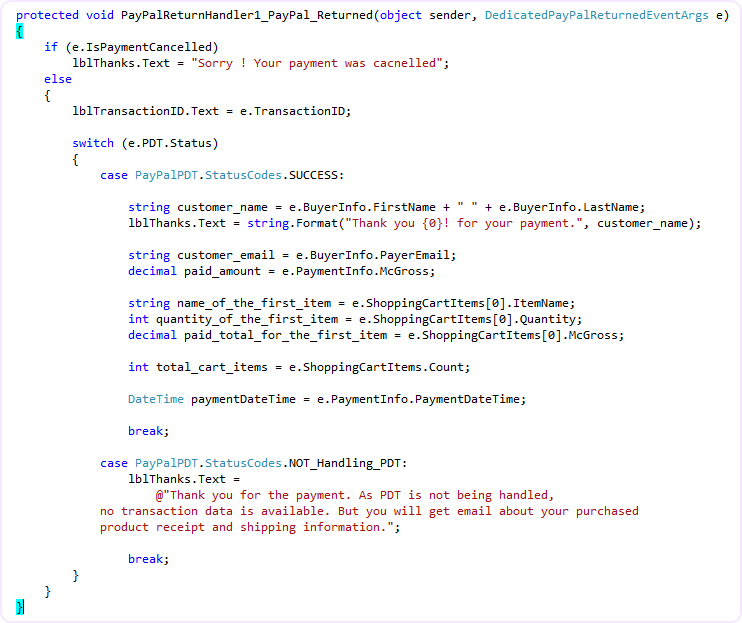
The following screen shot shows how to provide the payment complete return URL and payment canceled return URL in the design mode. Unlike other Payment Buttons (i.e. Buy Now button, Donation button etc..) Add to Cart button does not have PayPal_Returned event as you must use a dedicated page PayPal_Return handler for all Add To Cart buttons in your web application. You should set the same payment completed payment return URL for all Add to Cart button you use in your application if you think that all of the Add to Cart button is meant for a single transaction.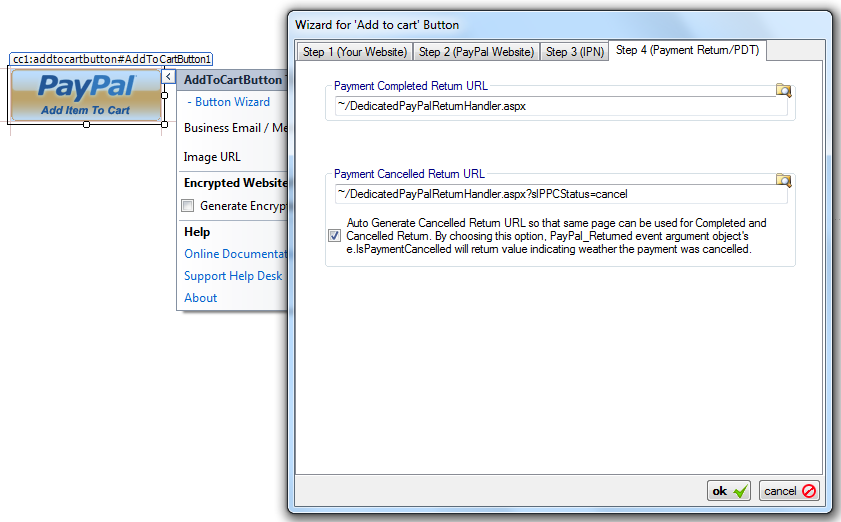 In your dedicated PayPal Return handler page, you can use a PayPalReturnHandler component and handle PayPal_Returned event of that component to execute your post payment logic. If you want to receive all the transaction data in PayPal_Returned event as you could in IPN, then, you need to turn 'Payment Data Transfer (PDT)' option On from your PayPal account. Once you turn PDT ON for your PayPal account, you will receive an Authentication Token which is called 'PDT Authentication Token'. You need to set that string to the PDTAuthenticationToken property of the PayPalReturnHandler component. The following snippet shows a typical example of retrieving transaction data from PayPalReturnHandler's PayPal_Returned event.
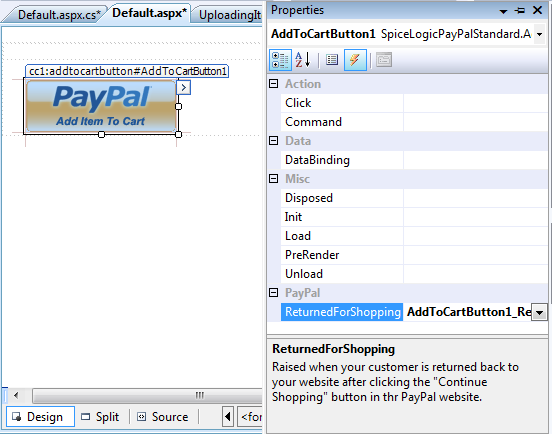
Returned-for-Shopping event explained : 
Add to Cart button supports an event named "ReturnedForShopping". This event is fired when your customer clicks the continue to shopping button in the PayPal hosted shopping cart and comes back to your website. You should use a single event handler method for all of your add to cart buttons. This event is not a background thread event, so you can use UI in this event handler method.
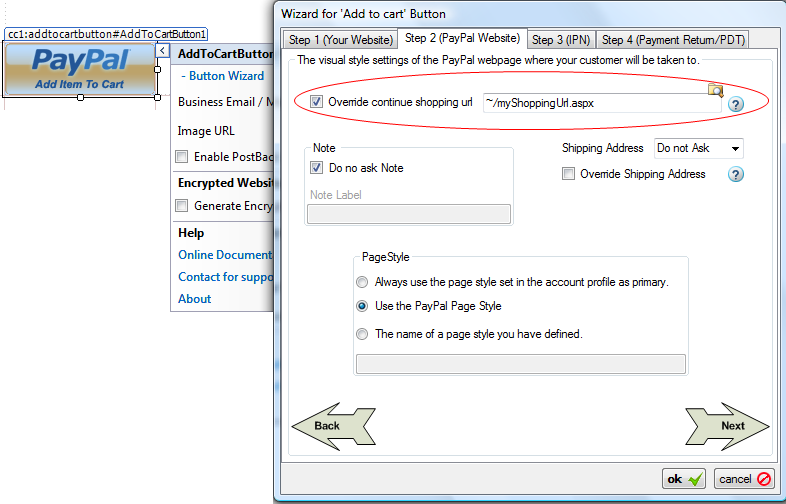
Please note: The continue shopping URL is auto generated to support this ReturnedForShopping event. But if you do not want the control auto generate this continue shopping URL, rather you want to use a specific shopping URL, then you wont be able to use this ReturnedForShopping event. You can override your preferred continue shopping URL in the design mode as shown in the following screen shot:
You may also want to place a View Cart Button which will take your customers to the PayPal Shopping Cart showing the added item..

So, PayPal_Returned event is fired after IPN_Notified event, is that right ?Answer : Not strictly but usually. What does it mean ? Ok, as I said, IPN is submitted to your website by PayPal Notification Service. It actually queues the notification task to it's Queue and depending on the tasks the notification service already has, the time when 'IPN_Notified event fire' varies. For the PayPal live site, the notification service task queue is not usually long but the task queue for PayPal Sand box is usually very long. So, when testing in Sand box, most of the time, you will find that your customer is already back to your website (PayPal_Returned event fired) before IPN_Notified event is fired. But, when you are testing in PayPal live site, most of the time you will find that, IPN_Notified event is fired before your customer is back to your website (PayPal_Returned event fired). Please remember, PayPal_Returned event is Synchronous and IPN_Notified event is Asynchronous. One event does not depend on the completion of another event.
A piece of advice : Never process the post payment logic (i.e. logging the transaction data in your database, verifying the payment and generating License Key, sending email to the payer with shipping information etc) from PayPal_Returned event even though you can collect all transaction data from PDT. Because, if the payer closes his / her browser while living in PayPal website before coming back to your website, then, PayPal_Returned event will never fire and so you will miss that transaction. Always use IPN_Notified event for processing post payment logic. Use PayPal_Returned event to convey 'Thank you' Message or doing some additional Read-Only tasks. What is a Read Only task ? Read Only task means, "the task that can be done by reading your database without writing / updating the database". Get the Transaction-ID from the PayPal_Returned event, query your database using that Transaction-ID and find out if any information is already recorded by IPN_Notified event. If found, show the download link / shipping information etc from your database. You should take appropriate measures to protect against Fraud Attempts.